Friday 30 December 2011

New Years Resolutions

I thought i would share my New Years Resolutions this year, i think it will be cool to look back at the list at the end of 2012. So here goes...

  1. Do a weekly grocery shop (instead of running around mad every afternoon trying to think of something to cook for dinner)
  2. Create a daily cleaning diary (instead of doing a HUGE clean on friday afternoons, i will aim to do a little something everyday)
  3. Post on my blog at least once a week (that also means finish a one piece a week)
  4. Promote my business to my local area
  5. Take an hour a week for ME time
  6. Take more classes at the gym 
And i think i will leave it at that...

I also wanted to share my favorite piece i have completed so far, it definitely has to be
 My french lounge, I love it so much that i have to keep it...


Hope everyone has a Happy New Year !! See you next year with bigger & better transformations...


Jess

Thift store prices $$

Even though i have a garage full of furniture i need to get through (literally over 10 pieces), i still couldn't help myself but to check out my local salvation army store today. I haven't been in there for months, and i normally don't purchase anything because the prices are usually a little pricey !! But today i was shocked, the prices were unbelievable !! It actually made me a little angry, the pieces are donated to the salvation army and are supposed to be priced for less fortunate people in need. But really $500 for a dining table & chairs !! i understand the profit they make from the stores all go to a good cause, which i love... but i just hate the fact these second hand donated pieces have to be sold so overpriced !! Here are some snaps i took while i was browsing today


 Crazy prices !!! i don't think you will see me buying from here anytime soon....


Jess

Monday 19 December 2011

French lounge

So after a little hard work, tears, sweat, laughter, anger, and joy i am glad to say i have completed my first ever lounge re upholstery YAY ! I must say though it wasn't as hard as i first thought it would be, which is always a good thing. I did have a few minor issues, and one HUGE unnecessary issue which i will get to in a minute...

Lets start back at where i began...

This is the antique french lounge i scored for $3 off eBay.  It had not so pretty fabric, and an outdated wood stain, BUT the bones of the piece was 100% perfect


 As soon as i got it home me and mum couldn't help ourselves we got stuck right into it, and started the dreaded removing the old fabric step. I took note, and a few pictures of how the lounge was upholstered, so it would make it easier for me when it came to that step.The amount of staples i removed from this piece was countless. A couple of blisters on the hands later It was all worth it when i saw how good the condition of this couch really was in. 

I didn't even get a chance to take a photo, before this little boy DESTROYED my lounge. I left the lounge in the lounge room for the night, because i was going to get up and start working on it straight away, but instead i was woken up to my mum screaming OMG JESS "you wouldn't believe what toby has done". Let me give you a visual...

Let me remind you this WAS my perfect lounge. Now i was faced with a lounge that i wouldn't of even touched in the first place. But i was determined i was going to fix this, i had already fallen in love with this piece.


How could this little cute guy do so much damage ??

So back to spotlight i went to fix my unnecessary problem, i wasn't really sure how i was going to deal with it, but i finally decided i was going to cut all the pieces of foam that had been chewed out into little pieces, fill it back into the HUGE holes, and cover the whole thing with thick wadding. Here is a peak at how i fixed the situation

Before i did this i painted the whole piece with a can on dulux flat white spraypaint. I didn't want to get the spraygun out for this job, it only took 1 can of paint and three coats for this piece. I finished her off with a clear wax.

Now the hard work begins... recovering. Fortunately i wasn't scared by this piece, i knew exactly what i wanted to do, and the look i was going for. You can check this post, where i mentioned my inspiration.

I covered her in this order
  1. The seat
  2. The sides
  3. The back rest
  4. The piping
  5. The back
  6. And lastly, the underneath
Next time i will do a step by step tutorial, but as this was my first piece and i was still learning as i was going, i forgot to take pictures along the way.

So here she is, finished ! and i have to admit im keeping her, i just cant part with my first re upholstery piece.


Do you love her as much as i do?
After this piece im so excited for my next uphostery mission. "did i really just say that"
haha wish me luck.

Jess

Linking up here:


http://savvysouthernstyle.blogspot.com/


Typography Transfer

I came across The Graphics Fairy blog about a month ago, and i instantly had an urge to try typography transfer onto furniture. I have a few pieces of furniture that have been sitting in the back of the garage for way too long now, so i decided to see if any of those pieces would suit my inspiration. And i was in luck, i found a large coffee table that would be perect.

The table intially had deep scratches, holes (from i dont know what), and some sort of laminate glued on. But nothing to worry about. The fiance got the belt sander out, and gave it a good sanding back

I then gave the legs a paint using a antique white, and whitewashed the top. I distressed this table a little more than i normally would and i really like how it turned out.

It was time to head over to the graphics fairy blog, and decide on a print i wanted to use. I wanted something that was fairly simple, but effective. I decided on this...
First i enlarged the print using block poster  (it's really easy if you want to try it out).
 I then put all the 9 pages together using sticky tape.

 I flipped the print upside down, and using a lead pencil i colored in the print

I turned it right side up, measured the centre, and sticky taped the edges in place.
Using a felt tip black pen, i outlined the whole the piece. I wasn't sure if it was going to work or not, as this was my first time trying it out, but once i lifted the paper and saw the outline i was amazed...it worked !!!
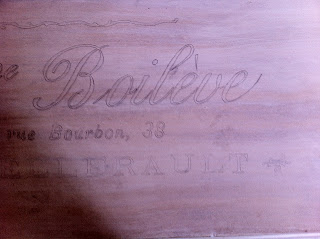
Here is a lok at the outline it imprinted onto the table

Using a black sharpie i colored in the whole thing, i was indecive whether to use paint or sharpie... sharpie won, and it turned out great !!

i finished thie piece with a bit of clear/dark wax, and wa-la
Take a look...


I LOVE IT ! definitely one of my fav pieces...

The Graphics Fairy gives a really good detailed instruction post on how to do this, so check it out HERE

Linking up to


Jess
Monday 5 December 2011

BARGIN !!

I can't belive i picked up this old french provinial lounge for.... wait for it.... $3.31  !!!

I am so excited... i love great bargins. I was browsing on ebay when i found it, yes it needs a little work but i can see the potential.

Here she is before, i havent picked her up yet. (this is the photo from ebay)


and here is some of my inspiration pictures


Cant wait to get started on this one !!
Related Posts Plugin for WordPress, Blogger...